


Saturday, 30 November 2013
5 Free Facebook "iPhone Apps"
Today most of the people use their mobile devices to access Facebook and any other social media. There are in-built apps or can be downloaded.
This post relates to some 5 free iPhone or iPad apps which are related to "Facebook".

Listed below are 5 "Free" useful and important iPhone apps related to Facebook.
- Emoji for iOS7: This app is for chat lovers. You can use this app for sending cool , awesome "Emoji icons" while chatting. Specially designed for iOS7 users, this app is compatible with all devices like iPhone, iPad and iPod Touch. Using this app you can select fancy fonts, create your own emoji icons, etc.
- Facebook Camera: This app is designed for sharing photos on Facebook faster than ever.
Over 460+ emoji icons which you can add in emails, text messages, notes, and almost anywhere.
- Facebook Pages Manager: This app helps admins connect with their audience and keep up with activity on multiple Pages, all in one place.
- Countdown!! : Featured to take care of your next event - your next vacation, the next concert, the next movie premiere, your child's graduation, your anniversary and more - in style!
These applications will definitely get more out of your Facebook and use the better options while chatting, sharing status updates, uploading images or videos, fan pages, personal events , etc. And the list will never end as lots of apps are found on iTunes for iPhone and iPad users who are interested in "Social Networking".
Surely these 5 free apps will help you out in some or the other way on the daily basis while using Facebook on your mobile device.
Surely these 5 free apps will help you out in some or the other way on the daily basis while using Facebook on your mobile device.
Friday, 29 November 2013
12 Points to check for improving Fan Page
After many attempts of trial and error basis, some points do get remained for making "Fan Page" a success. The success of course depends upon the number of likes, posts made by members, frequency of engaging fans, the type of content, etc.

The success is descriptive. Content matters the most in any case whether it is a website or a blog or a fan page or even a status update that you make every day in your Facebook wall. If the content is interesting and engaging, people do come and read and wait for more updates from your side.
Sometimes, if the content is most alluring, then some fans do "Bookmark" your fan page to know more about your pages.
This all comes with experience and mainly the different techniques to make it a success.
When you start any business, your first intention is not to earn money but to earn people. The fan pages have to be created "for the fans" and not for your purpose. Success will follow when more and more people visit your page for more interesting information.
It may happen sometimes that even after many attempts, the fan pages don't accelerate as needed and the result happens to be a big "FAIL".
This point is not for getting frustrated but to think more about how to bring more traffic to your fan page. For that some sort of "SEO" also is needed. This post mainly depends on this that "How to do SEO of Business Fan page"? Bringing all things in to my mind, I have made a list of 15 points for you to get through and enjoy a successful fan page.
15 Points that matter for the sure success of any business fan page or any fan page:
- Keywords in Fan Page URL: Have you noticed that the URL of your fan page is based on the proper keywords ? If not then this is the first and important point that has to be noted and changed accordingly. In Facebook, once you get 25 likes means fans, it gives you the opportunity to change the user name or also called as Facebook vanity URL.
- Keywords in description of fan page : Same like URL . The keywords that are placed in every important bit of fan page brings Google crawlers to index the page and in turn bring to the first page of search results. Because ultimately the main intention is to get more visitors. And this is possible if the page is optimized well.
- Optimization in Fan Page status updates : When you are posting new stuff on the wall of the fan page, use the right kind of keywords with other optimization tips like image tags for images, video tags for videos and other.
- About box : This is the most important place where visitors will get the required information they are looking for. Optimization here is also needed.
- Limit the content : This may sound absurd but the visitors can read the full content on your website. So just provide some useful information and insert the link of your site. People will read there. Hence don't fall into the content trap.
- Photos: Look whether the images and photos that you have uploaded on your fan page are really optimized with keywords or not. If not then get it done immediately. If needed include the link in the caption area of a photo.
- Insert the "Like Box" widget on website: The widget plays an important role in getting visitors to your fan page. Know more about "Inserting a Like Box widget or Fan Page widget"
- Encourage your fans : Something tricky task but sure way to get fans. The engagement of fans in your fan page with the use of surveys, video contests,
- Make use of "Trending Now" feature : Recently Facebook has launched this feature called as "Trending Now" which displays the latest trending topics across the world on your Facebook wall or screen. Whenever there is a post or news that relates to your fan page then you can put your link there.
- Arrange "Events": The interaction with fans will make more fans engage in your topic. One will bring their friends and they will bring their friends to your events.
- Create "Quiz": Again like "Events" , Quizzes also make them engage in your fan page.
- Link your Twitter Profile :Your Twitter followers and fan page fans are different. To add your followers to fan page you can link your Twitter account to your Facebook fan page.
These were some of the points that every page owner should keep in mind while creating or promoting a fan page. Because after all you are creating fan page for viewers and not for your own self.
Thursday, 28 November 2013
Bring more business using "Facebook Places"
We have discussed about creating Facebook Fan Pages, business pages, creating Static iFrame tabs, creating video contests, which mainly gave more exposure to the online world for your business. Taking it more forward, if people or your fan page fans are around your business location, then they will not be intimated through just business pages. For that you have to create "Facebook Places" in addition.
In one of my posts earlier, I have mentioned about adding "Geo Location" using Google Maps. But this will not intimate the visitors who are in the vicinity of your business location.
If people are around your business location building, then using their mobile phone apps, your business details should pop up on their mobile devices. Using "Facebook Places" this is possible.

In Facebook "Places" is an application that allows location based feature on your iPhone and other smartphones.
Not only for business but also you can see where your friends are by giving your real world location.
Using this app, you can check in to the places.
Moreover, for business if some events are upcoming then setting your location or places will bring in more public.
This post is mainly for business fan pages to set the location or the address of the business. Then using "Places" app, people will get notified about it when they are nearby you office or the exact location.
To make this possible,
- Log in to your Facebook account
- Go to your "Business Fan page "
- Click on "Edit Page"

- Select "Update Page Info" option from the drop down menu
- In the "Page info" tab, click "Edit" link besides "Address" option

- Enter the details of your location of business office address

- Then click "Save Changes"
Note that the details that you entered are correct and they will be updated in the system after few hours.
So, when it is updated in the system of Facebook, the place or the location will be popped up on the users' iPhone when they are nearby or in the vicinity of your office or business. Using this they may visit the place and if you have set any event or offers, then they will really find that interesting to visit again and again.
Such were the steps of creating "Facebook Places".
Wednesday, 27 November 2013
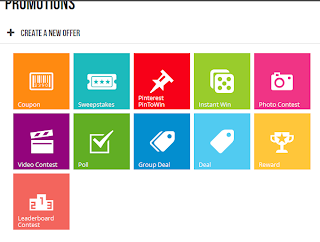
How to create a successful "Video Contest" in Facebook
Videos and Photos make everything viral on Facebook. You must have taken your own example of uploading your own photo or video which got more likes and shares. Same trick applies for your Business fan Pages to make them popular.
To make any business page popular or successful, some tricky ways have to be applied. One of the main tricks that creates interest in your page visitors or viewers is "Video Contest".

In Facebook, if you want to create a successful "Video Contest", what factors should be considered:
- Why you are creating it
- Who are your target audience
- Which offers will make them attractive
- What are the gifts that you will be presenting to your contest winners
- How will you decide or on which basis will be a participant be declared as the winner
- For how many days will be the contest open for participating
After considering these factors and making all points clear, the main part of creating the contest begins.
The steps to create a successful "Facebook Video Contest" are :
For using "Woobox" apps you need to pay to be the member of the site.
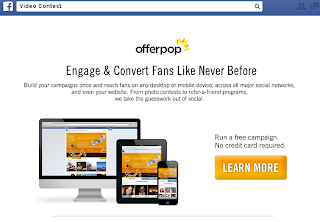
There is another way for creating your Video contests for Facebook pages. Another effective way to create is using "Video Contests " app by "Offer Pop" .
To create video contests using free options then use Offer Pop's "Video Contest" tool or app. The steps are :
The steps to create a successful "Facebook Video Contest" are :
- Log in to your Facebook account
- In a new tab open "Woobox" site

- Click "Get Started" button on it
- Select "Promotions"
- Select "Video Contests" option from the list of tabs
- In the "General Settings" enter the details of the video contests like title, description, restrictions, etc

- Now below set the "Fan Gate" either as "On or Off" . To make your fans "Like" the page then set it "ON" either set as "OFF".

- Set the "Allowed content" and "Entry start and end date "

- Here you can set the dates with other settings like awards, age restrictions, etc
- Below click on "Save Settings"


For using "Woobox" apps you need to pay to be the member of the site.
There is another way for creating your Video contests for Facebook pages. Another effective way to create is using "Video Contests " app by "Offer Pop" .
To create video contests using free options then use Offer Pop's "Video Contest" tool or app. The steps are :
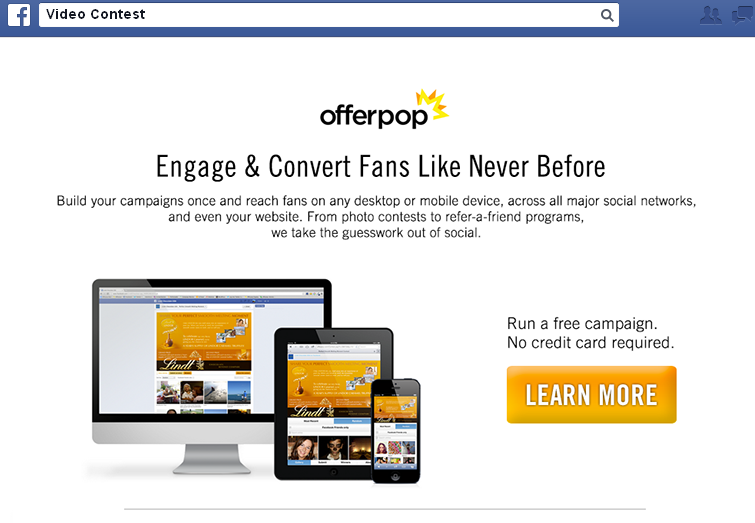
- Type "Video Contests" in the Graph search
- Select the second app which is from Offer Pop
.PNG)
- Click on "Learn More" button
- Click "Try it Free" button

- The app will ask whether it is for "Facebook apps" or "Twitter apps"

- Click on "Log into Facebook Apps" button
- The app will ask for permission. Click "Ok" and then will access your page. Click "Ok" here too.

- It will "Redirect"to your Page.
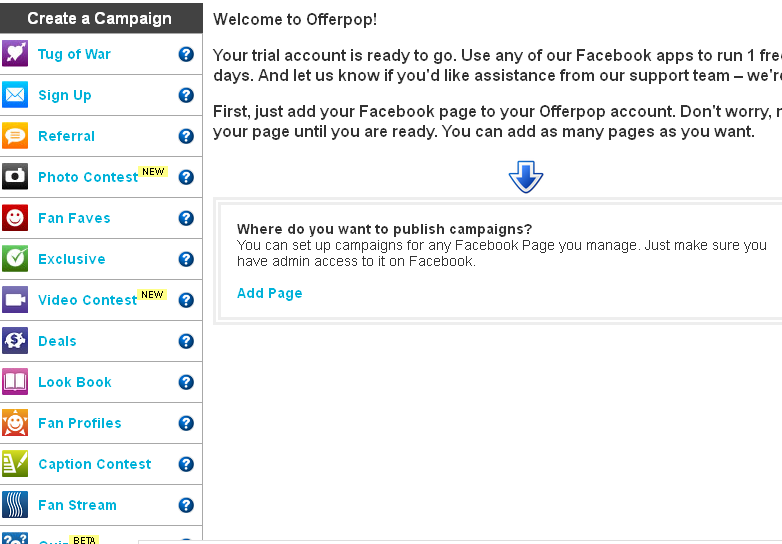
- Set up an account in "Offer Pop" by entering the required details

- Click Continue and then accept their terms and conditions

- Select "Add Page"
- The pages that you have created in Facebook will appear. Select the one where you want to create a video contest
- Click on "Purchase the subscription" button after adding the page
- Then "Choose Plan" of free subscription
.PNG)


* A credit card is required to activate your plan. This page has less than 101 fans, so you qualify for free access. Once your page reaches 100 fans, you will be prompted to purchase a subscription. You can cancel at any time, for any reason; your cancellation will be effective on the last day of the current billing cycle.
If you provide with the details then the plan will be activated. It is a "video contest" that you are creating and for your business page promotion. Hence adding some more functionality by paying some money for activating the contest will boost your promotion technique.
What are "Video Contests" in Facebook
When it comes for promotion of business using Fan page in Facebook, lot of points and tricks have to be applied for doing so.
The promotion of the Facebook business page depends on most effective and important formats which are Photo contests, Video contests, surveys, sweepstakes, etc. Introduction of "Photo Contest" app was done in 2012 with the release of yet another similar app called "Video Contests".

What actually is "Video Contest" in Facebook?
The fan page admins who have business pages want to engage their fans with some attractive offers and an opportunity to participate with brands on Facebook.
Video contests can be created with an app.
As "Videos" go viral, tricky way to promote any business page is to create a "Video Contest" for your fans and attract new fans."Video Marketing" is termed as the best way to promote your brand or business with correct arrangement of keywords, content and attractive offers for your visitors.
Why to create "Video Contests" in Facebook ?
As stated above, videos go viral and termed as the best way to promote the business or brands. Think of an advertisement without their videos. Will you buy any product with the name and brand of the product just by seeing the label on it? Maybe the trust factor will be missing. That will be gained with the use of videos which will inform about the features of the product or brand.
In the similar manner, your brand needs exposure to more customers and to gain the trust of them the videos should be created. But the video contest factor or promotion technique will not only gain more visitors for your fan page but also engage them in the contest to win the "Special offers" decided by you.
Features of "Video contests"
Taking these points into consideration, lets get started for creating a successful "Video Contest" in Facebook.
The promotion of the Facebook business page depends on most effective and important formats which are Photo contests, Video contests, surveys, sweepstakes, etc. Introduction of "Photo Contest" app was done in 2012 with the release of yet another similar app called "Video Contests".
What actually is "Video Contest" in Facebook?
The fan page admins who have business pages want to engage their fans with some attractive offers and an opportunity to participate with brands on Facebook.
Video contests can be created with an app.
As "Videos" go viral, tricky way to promote any business page is to create a "Video Contest" for your fans and attract new fans."Video Marketing" is termed as the best way to promote your brand or business with correct arrangement of keywords, content and attractive offers for your visitors.
Why to create "Video Contests" in Facebook ?
As stated above, videos go viral and termed as the best way to promote the business or brands. Think of an advertisement without their videos. Will you buy any product with the name and brand of the product just by seeing the label on it? Maybe the trust factor will be missing. That will be gained with the use of videos which will inform about the features of the product or brand.
In the similar manner, your brand needs exposure to more customers and to gain the trust of them the videos should be created. But the video contest factor or promotion technique will not only gain more visitors for your fan page but also engage them in the contest to win the "Special offers" decided by you.
Features of "Video contests"
- Viral Social Sharing
- Integrated social response
- Flexibility
Taking these points into consideration, lets get started for creating a successful "Video Contest" in Facebook.
Tuesday, 26 November 2013
3 Tools to measure your "Facebook Success"
When you use Facebook daily with other social media sites like Twitter or Pinterest, etc , then your online presence should be measured or judged with some online tools.
These tools will report about how your Facebook posts are interacted, how they are popular, what others demand from your fan pages or posts, how frequently they check your updates or whether they like or share your posts or fan pages. The answers to all these questions will be given by some useful online tools to measure your online success as a businessman or entrepreneur or a user.

I have made a list of some useful tools for you which will measure your online success in the field of "Social Media".
Booshaka: This tool is mainly used for :
- Understanding your engaged fans and followers
- Recognize and reward the people
- How they influence their followers to follow you
- Increase engagement

Using this tool, you can easily find out the keyword that your fans use. Using that keywords you can engage them more into your fan pages.
It also ranks your success. The tool provides you with the information about what your fans like on the selected topic and what they are finding for on Facebook.

This toll provides you with the Facebook page ranking and real time stats.
You can compare the biggest fan pages by the category and sort by number of page likes and people talking about this.
Monitoring of fans for maintaining fan pages and creating new ones.
SocialMotus : Again a different type of tool for business related social media people.

Using this tool, you can :
- Manage Facebook account
- Monitor your brand
- Measure social media performance
- Track conversion rates
- Discover what people are saying about your brand
- Schedule and publish your posts across Facebook and Twitter accounts
- Discover highly targeted prospects who are interested in your brands
- Improve outcomes
No doubt that you have "Facebook Page Insights" to examine the performance of your page and its fans who are engaged into your brand, but one who don't have the fan pages and who are just users need to know how to make their social presence more popular.
Hence these set of tools to keep them updated in their respective social fields.
"This day....That Year" of your Facebook News Feed
Since many years Facebook is accessed and updated daily. Some of your friends have posted a beautiful status update which is liked by you and images that impressed you. This may be in your memory, but not all posts are kept into memories.

Are you going to search from the heap of posts and likes and comments what you or your friends have shared in Facebook? May be if you start today, you will end getting the result very late.
Say for example, you want to know what you did this day means the date today and that year means a particular year that has gone by.
By searching through your News Feed will waste your time and energy too. Lets make it simple and find out a solution for this question as to what your friends did "This Year ... That Day".
The trick to find out :
- Log in to your Facebook account
- At the left side of the screen, go to "Apps"
- Click on "On This Day" app or just type "https://www.facebook.com/todayinhistory/" in the browser

- You will get the details of the news feed of the selected year

- You can select the year of your choice from the drop down arrow by clicking on it besides the year
- The year selected will display the results of News Feed of that year on this day

Please note that the year you joined Facebook will be the starting range of year in the drop down list. Also all the feeds will not be displayed of that year. Only a particular date like if you are accessing this app on 21st October 2013, then the app will display the News Feed of 21st October but of the selected year.
Monday, 25 November 2013
Create your "Facebook Business Card"
Over 800 million Facebook users access Facebook daily like their email. Out of them some are business people who are promoting their business via Facebook by creating "Business Fan Pages".
If the online media is very much attracted to your products displayed in your business page in Facebook, then the display of that should be done on a physical thing that will represent the popularity of your business online.
The physical thing that acts like a card (business card) which shows your Timeline, details about you and your business, etc. This is possible via "Facebook Business Cards".

The image besides displays the proper Facebook business card which has important details like your photo, cover photo, name, location, etc.
Showing your online professional presence using Facebook's Timeline should be made via an "Online Business Card" creator.
And that is done by none other than "Moo" .
Moo.com is a online printing business. Recently they have started creating "Facebook Business Cards" too. These Facebook cards are simple to make, with excellent quality that helps you show off your personality offline.

How to create your own "Facebook Business Card"
- Open "Moo.com"
- Click on "Sign In "

- You can use your Facebook account to sign in or you can create a different account in Moo.
- Simultaneously open your Facebook account on the other tab of browser
- If you are using your Facebook account, then click "Facebook" button in Moo.com
- It will ask for permissions to access your profile. Click "Okay"
- In Moo.com, after you are logged in, click on "Business Cards" drop down menu

- Select "Facebook Cards"
- Now click "Make Cards for Me" option

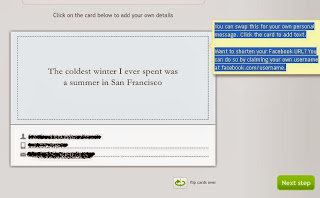
- In the preview you can see that your profile photo with your cover photo is imported by Moo.
- Set the "Front of cards" section

- Here you can re-size the cover photo by clicking "-" and "+" icons and it will be changed automatically in the preview section below
- Click "Next Step" button
- Now set "Back of Cards" section
- Enter the space provided for additional information. Below you can see that your Facebook profile name with other details are imported.
- Click the "Flip" card button below to see front and back side.

- As you click the "Flip" button, both sides will be displayed one by one.
- Click "Next Step"
- Its now time for "Final Checklist" . Check the boxes as accordingly.

- Click "Next Step" button after checking all boxes
- The final step is to select the "Country" to send the business card via "Global Mail".
- Lastly click "Checkout".


To get your business card delivered to your location, you have to select the "Shipping options".

Here you have the facility to select the two types of shipping options. They are Express and Standard. By default the option is set to "Standard" and its estimated date of shipping will be displayed. But if you want it to be delivered as soon as possible, then select the "Express" option which will be delivered before. But for that you will have to pay extra charges.
- Later on click "Continue" option.
- Enter the "Shipping Address "

- Enter all the details in the address sections and click "Continue" .
- Enter the "Payment Details" and click "Continue"

This will mail you the created Facebook Business Card to your location specified.
How to let people comment on website content using their Facebook profile
A blog or a website will have articles and posts regarding a particular topic. The comments are necessary for the posts or content on the website.
The comments that people post below your article or content of the webpage, will either ask them to login to any one of their accounts like Google, Facebook, Disqus, Twitter, Linkedin etc. If people should leave comments using their Facebook profile directly on your site, then you have to use a Facebook social plugin called "Comments box".

There are many social plugins in Facebook that you can make use of for your website or blog. One of them is "Comments Box".
Steps to add "Comments Box" code or plugin in your website / blog
- Log in to your Facebook account
- On the other tab of your browser open the website or blog
- Now in Facebook tab, open "Plugins"
- Click on "Comments"

- Now you have to enter the details of your website and other for embedding the comments box in your website
- First go to the website on the other tab. Copy the URL of it
- Paste it in the "URL to Comment on" text box in Facebook plugins tab
- Set the "Width" of the box accordingly
- Set the "Number of Posts". By default it is 5. Change it if you want to.
- Select the "Color Scheme" either "Light" or "Dark"


Now click "Get Code" button.

The code will be displayed on the screen as shown below:

And you can see that below every article or blog post, the comments are made available for the Facebook users to use their profile and comment on.
Sunday, 24 November 2013
Online Backup provider, "iDrive" launches "Facebook Backup" feature
Users who use Facebook daily to update their photos, like on some others' images or posts, leave a comment for posts, have a lot to store if they want to store their online Facebook data.
Whether you have liked someone else photo, commented or even if you were tagged in some photos and comments, these data will be safely stored online in "iDrive".

Features of "iDrive"
- Real time backup
- Multiple device backup
- Facebook Backup (newly introduced)
- Retrieve data
- Secured
- Fast
Recently, the online backup and storage service provider, iDrive, has launched a new feature that will backup all your Facebook data that are mentioned above. Photos, likes, comments, tags, videos, etc.

Regarding Facebook Backup in iDrive:
As Facebook has become an integral part, users use it for sharing their images, videos, friends who tag in their photos, etc. Now in Facebook, you can download videos and photos but it does not give you the ones that you were tagged in.
Also in case your friend has "unfriend" you, then the tags and photos where you were tagged in his or her photos will not be included.
This is made possible by iDrive by launching the new feature of "Facebook Backup" too.
In this process, iDrive does not store the important details like your login details and your contact information.
Hence create an account in iDrive and enjoy backup of your Facebook important data.
How to delete or remove "Groups" from Facebook account
As you can create "Groups" in Facebook, you can delete them too. But when you are deleting the group, you have to take in to the consideration that members who are connected with your account will also have to be informed or intimated why a particular group is being deleted or removed.
Facebook Tips and Tricks group page.

If you are the admin of any group you created, then you can delete that if you think that this group is not so successful and can create a different one.
Either you can delete the group of which you are admin or you can "Leave a Group" if you are a member of that group.
If you want to delete your created group, then :
- Log in to your Facebook account
- Go to your Timeline
- Click on "More" button
.JPG)
- Select and click "Groups"
- Hover your mouse to the top right of the group that should be deleted

- Click on the pencil icon at the top right
- Click on "Leave Group" option
- Before really quitting, it will ask whether you really want to delete this group

- Click "Leave" button


If you are the member of any group you can leave that group using the same steps.
Before deleting any Group in your account:
- Each member must be individually removed
- Notify members that you are deleting a particular group by informing them using a mass message by clicking "Message all members" beneath group photo
- If you are the sole admin for a group and you are deleting it then make a note that after you delete, all other members will become the admins of that group.
- Don't delete yourself as an "Admin". First confirm that another admin knows how to close the group.
- If any members remain, the group will get deleted but will not expire.
Hence a very simple and easy way to delete any group in your account.
Friday, 22 November 2013
Facebook Keyboard keys to type "Half"
Have you ever noticed if you wanted to type numbers that will represent "One and Half" or "Two and Half" in Facebook?
Well, there are certain set of keys to add such type of number formats in Facebook. As Facebook don't have the way to add or type these special numbers or fonts, there is a way to use keyboard keys for getting the results.

Simply use the below mentioned keyboard keys to type in such format.
- Press "Alt" key
- Press together "0,1,8 and 9" keys on your number pad